Tampilkan postingan dengan label Gluten Free. Tampilkan semua postingan

Chocolate Pudding - naturally gluten-free

Chocolate Pudding fills the spot of my earliest dessert memory !
 It has been a life-long comfort food even though my first memory of it involves something less than 'comfort' .
I was about 3 or 4 years old and I was sitting in my spot at the kitchen table - the window behind me.   Our home at the time was a little two room cottage without indoor plumbing or running water  -  I believe at that time we did not yet have electricity either. The wood stove Mom cooked on was also what kept our little house warm.
Mom had made chocolate pudding for dessert that day and I could hardly wait to eat it!
I remember Mom served it in soup bowls and handed me a generous helping.
I enjoyed  it  and wished for more.
Chocolate pudding has never been my Dad's favorite and I looked over to see that he was not finishing his serving.  I asked if I could have it and with a twinkle in his eye he gladly passed over his bowl and I eagerly ate it.
I still was not satisfied and asked Mom if there was any more.
I remember Mom's face as she asked, "You want MORE?"   but to my delight she got up and scraped the last of the pudding out of the pot into my bowl.
I had almost finished it when I began to have a funny feeling ... the pudding wasn't sliding down quite so easily but I tried to ignore the unfamiliar sensation.   I must have started to look a little green because suddenly Mom jumped up, grabbed the pudding pot and held it under my chin.
 Hmmm... how shall I say this delicately ?  I'm sure you guessed it - the pot was once again filled with chocolate pudding !
That experience, however, did not spoil my love of the simple dessert ... though I never again ate three generous helpings!

When I make it now it is a memory trigging taste taking me back to my childhood , something the packaged instant or cooked chocolate pudding just doesn't do  for me!   The flavour of the from scratch, home cooked pudding is just soo much better !
So here is my recipe ...

Chocolate Pudding
  • 3 cups whole milk 
  • 3 tbsp cocoa powder 
  • 4 tbsp cornstarch 
  • 1/2 cup sugar (less if your tooth isn't as sweet as mine) 
  • 1 tsp vanilla flavouring 
  1. Place milk in saucepan to heat,  reserving 1/2 cup 
  2. Mix together cocoa, cornstarch and sugar and then sift to ensure a perfectly velvet smooth pudding
  3. Stir dry ingredients into 1/2 cup milk , then add to heated milk 
  4. Cook, stirring continuously  until it begins to bubble and the pudding thickens. 
  5. Cool  
  6. Garnish, if desired,  with toasted almonds and/or dab of whipped cream or ice-cream.  
PS. As noted by a commentor , this can be used as a pie filling. You may, however,  want to add a little more cornstarch  - maybe a couple of tsp more -- just to make the pudding a little stiffer. 

Breaded Chicken Strips Gluten-Free


This is a new family favorite recipe. Easy to prepare, taste great fresh or as left overs warmed up the next day.
  • 6 skinless chicken breasts -- ( or about one per serving) 
  • 1/2 cup milk
  •  1 crushed clove of garlic 
  • 1/2 loaf of gluten-free bread crumbs.  ( I  much prefer using my own home baked bread to make the crumbs...  if a loaf is getting old - or baked specifically to make bread crumbs-  put it in your food processor to make fine crumbs.. Then leave sitting uncovered on the counter, stirring occasionally until well dried --  then store in refrigerator  in ziplock bag)  
  • 1 cup Arrowroot starch flour,  spiced  to taste ( I use salt, pepper, anise seed, a little Thyme) 
  • 2 slightly beaten eggs
  • oil for frying - I use a mixture of olive and grapeseed
1. Marinate chicken in ziplock bag with milk and garlic clove for about 2 hours -- or longer 
2. Drain chicken  and cut breasts into 1/2 -3/4 inch wide strips
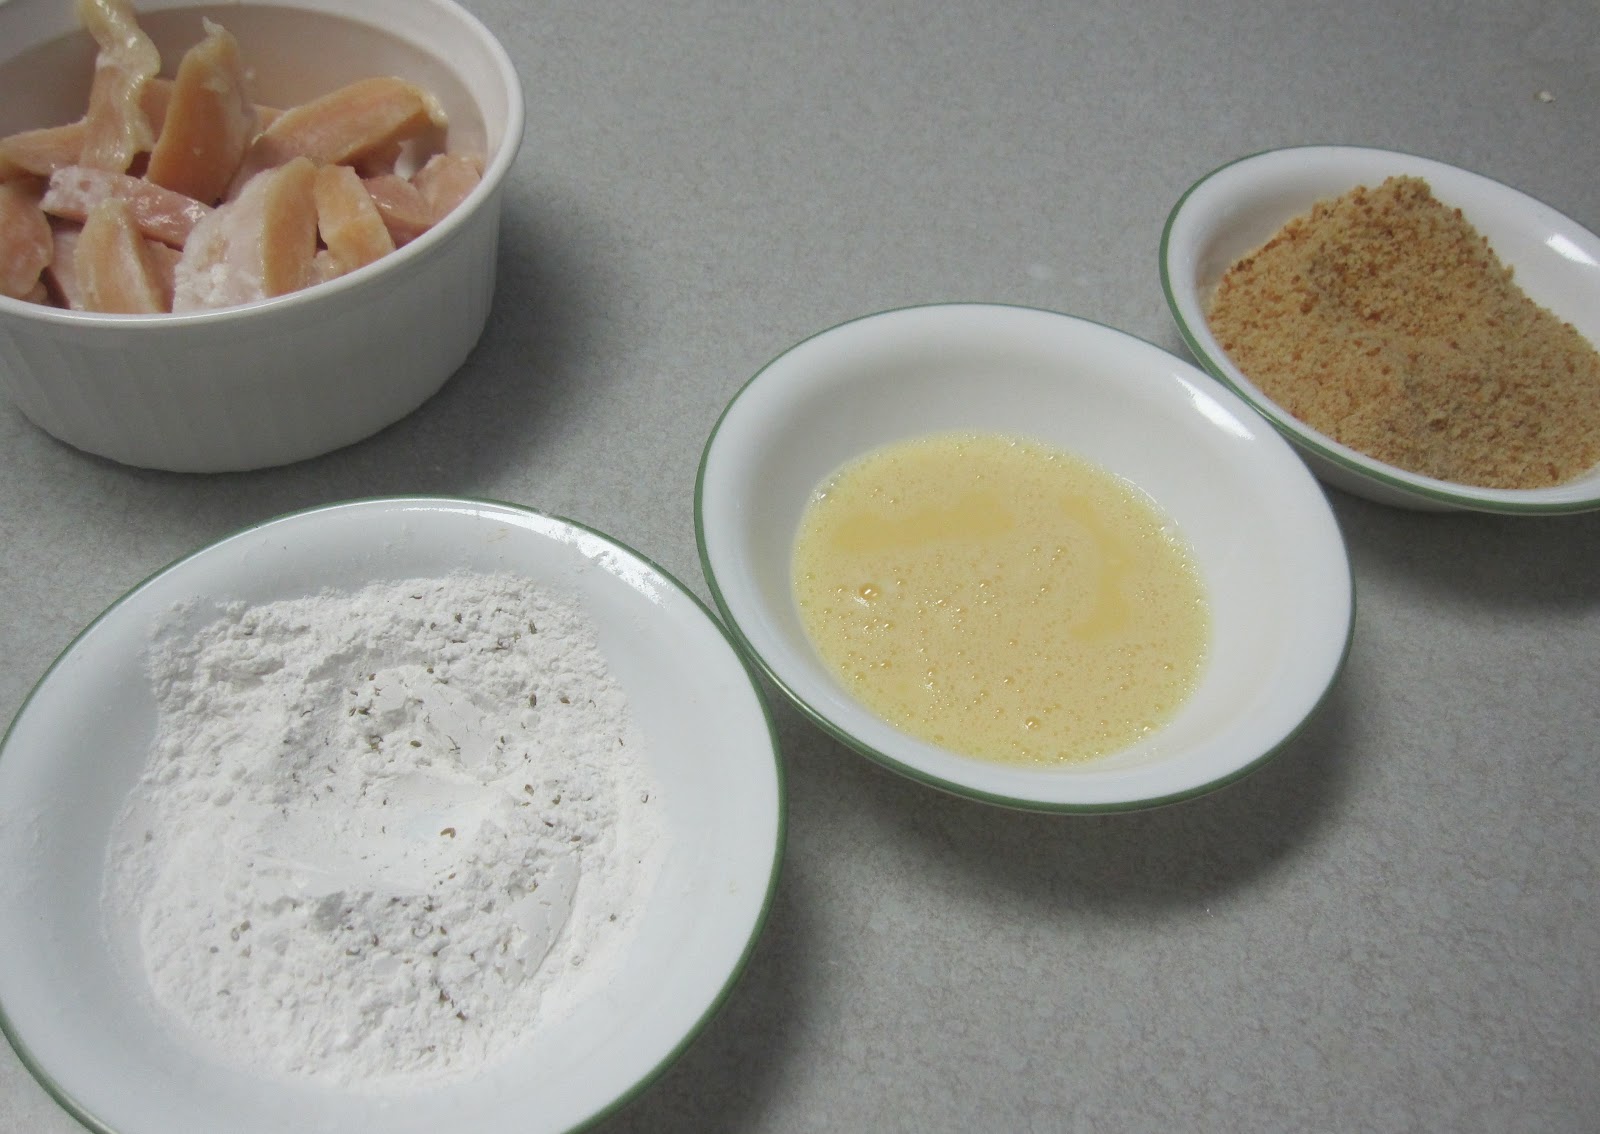
3. Place bread crumbs, Arrowroot starch flour and eggs in three separate bowls 
4. Assembly line fashion --  dip each 'finger' first into spiced flour then into eggs then roll in the breadcrumbs 
5. Fry in skillet with enough oil so chicken fingers are not sitting on bottom of pan --  they actually absorb less oil if they float in it then if they sit in it.

6. Serve hot !   Delicious !!!

Almond Sweet Rolls Gluten Free


I am so pleased to share this recipe with you.
The rolls are wonderfully light and fluffy and the taste is exceptional .
I was rewarded by my granddaughter's reaction with her first bite ,
"Oh, my goodness, these are SO good !" and my gluten loving husband said... 
"These are miraculously good!"         I had to smile, didn't I ?
These keep well, they are still soft and good the next day.

Almond Sweet Rolls
  • 1/2 cup water
  • 1 tsp sugar
  • 1 tsp gelatin
  • 1 1/2 tbsp reg. yeast
  • 1/3 cup milk
  • 1 egg
  • 1/4 cup butter
  • 1 tsp almond flavoring
  • 1/3 cup sugar
  • 3/4 cup millet flour 
  • 1/3 cup white bean flour
  • 1/4 cup brown rice flour
  • 1/2 cup tapioca starch/flour
  • 1/4 cup cornstarch
  • 1/3 cup almond flour
  • 1/4 tsp salt
  • 1 tsp baking powder
  • 1 tsp xanthan gum
  • sweet rice for handling dough
  • 1 egg white
  • sesame seed or poppy seed (optional)
  1. Mix sugar and gelatin, add warm water and yeast - let proof
  2. Beat butter and sugar, add egg flavoring and warm milk
  3. Blend well together dry ingredients
  4. Add dry ingredients all at once to liquids , blend on low , then beat on high for 2 minutes.
  5. Turn dough out onto counter sprinkled with sweet rice ... Work in enough sweet rice (I use about 1/4 cup) to make the dough just barely not sticky (on the outside, don't try to work the flour into all the dough) It is important to keep dough as soft as possible.
  6. Pat dough into a 13 or 14 inch circle -- using a pizza cutter dipped in sweet rice flour, cut circle into 16 equal segments.
  7. Starting at the wide end of each segment roll up ending at point - dipping fingers into sweet rice flour if dough is sticking.
  8. Brush tops (I find it easier to use my fingers rather than a pastry brush) with whisked egg white.
  9. Optional -- sprinkle tops with poppy seed or sesame seed
  10. Place rolls on parchment lined cookie sheet and let rise in warm place about 1/2 -3/4 hour.
  11. Bake in 375 degree oven for 20 minutes or until golden brown.

Skillet Naan Bread Gluten Free


This is the newest favorite treat in my family. Since out of the 6 of us 3 eat Gluten Free it is always nice to be able to serve food that is enjoyed by all 6.
And my granddaughters (one Gluten Free, one not) are always my official taste testers appropriating approval ratings. My Naan bread got rave reviews !

Naan Bread
  • 1/2 cup of water
  • 1 tsp sugar
  • 1 tsp gelatin
  • 1 1/2 tbsp reg. yeast
  • 1/4 cup olive oil
  • 1/3 cup yogurt , I have also used sour cream with great results!
  • 1 egg
  • 1/2 cup millet flour
  • 1/4 white bean flour
  • 1/4 brown rice flour
  • 1/2 tapioca starch/flour
  • 1/4 cup sweet rice flour
  • 1 tsp xanthan gum
  • 1/2 tsp baking powder
  • 1 tsp salt
  • sweet rice flour
  1. Mix sugar and gelatin , add warm water and yeast - let proof
  2. Beat oil, egg, and yogurt (or sour cream )
  3. Add proofed yeast
  4. Blend well together dry ingredients and add all at once to liquids
  5. Mix together, then beat on high for 2 minutes
  6. Turn dough out onto counter sprinkled with sweet rice flour
  7. Using as little sweet rice flour as possible, work into dough only until dough is able to be handled
  8. Using hands pinch off pieces of dough to form into thin circles
  9. No need to let them rise for more than a few minutes.
  10. Pan fry in a hot skillet in a little oil. Brown on both sides -- bread will rise and puff up with bubbles.
  11. Serve with Judy's Tzatziki Dip , or use for Anneliese's Naan Pizzas, or just enjoy them any way you please !
*

Paska Gluten Free -- improved recipe


I worked with my gf Paska recipe and came up with this variation that I prefer to my other one. It smells delicious while baking.
  • 1 tsp sugar
  • 1 tsp unflavoured gelatin
  • 1 1/2 tbsp regular yeast
  • 3/4 cup milk
  • 1/4 cup oil
  • 1/2 tsp vanilla , or almond extract
  • 3 eggs
  • 1/2 lemon - juice and zest
  • 1/2 cup sugar
  • 1 tsp. xanthan gum
  • 1/4 tsp salt
  • 1/2 tsp baking powder
  • 1/2 cup millet flour
  • 1/4 cup white bean flour (small white navy beans)
  • 1/4 cup brown rice flour
  • 1/2 cup tapioca starch
  • 1/4 cup cornstarch
  • 1/4 cup sweet rice flour
  1. Mix sugar and gelatin , add warm milk - whisk in yeast and let proof
  2. Beat eggs, sugar, vanilla, oil, and lemon juice and zest
  3. Add proofed yeast
  4. Blend together all the dry ingredients
  5. Add dry ingredients all at once to liquids and beat on high for a couple of minutes
  6. Spoon into desire greased pans or tins (smooth tops with wet hand) and let rise in warm place for about 30-60 minutes until doubled in bulk.
  7. Bake at 350 degrees for 20-30 minutes
  8. Let sit in pan for a few minutes before removing to cool on rack.
  9. Let cool completely and then ice with white icing and decorate with sprinkles - coloured or chocolate
If not eating the same day , freeze until needed.
*

Cream of Spinach Soup


Many years ago, our church cell group was planning a pot luck social.
One young wife, Nina, offered to bring Cream of Spinach soup. My husband immediately wrinkled his nose and decided it wasn't something he would care for. Nina insisted it was good and he WOULD like it. He wasn't convinced.
But when he - only to be polite - allowed himself to be persuaded to take the first spoonful , he was surprised and quite happily had two helpings! He still periodically puts in a request for me to make this soup.

  • 2 tbsp butter
  • 1 onion finely chopped
  • 1 medium sized potato, cut into small pieces
  • 3 cups fresh spinach washed and stems removed. (or one package frozen)
  • 4 cups chicken broth
  • 2 tbsp. flour (or for gluten free - 1 tsp. sweet rice flour with 2 tbsp cornstarch)
  • salt and pepper to taste (if broth is unseasoned)
  1. Melt butter in saucepan
  2. Add chopped onions and chopped potatoes - stir , frying lightly
  3. Add chicken broth
  4. Stir in chopped spinach and cook about 20 minutes.
  5. Mix flour with a little cold water and add to the soup stirring and cooking for a couple more minutes.
  6. Pour soup into blender and purée until smooth.
  7. Pour back into pot to keep warm until serving.
  8. Serve hot with sour cream garnish ( I also like it cold)
**

Gluten Free French Bread

Gluten and wheat free bread baking is new to me, but there are so many people who have food allergies that I thought it would be a good idea to learn to bake bread so everyone around my table can enjoy. This recipe was suggested to me from a friend and I was delighted with the result both in looks and taste. I'm sure you could mix your own flour blend and keep the cost down, but I thought I'd start with a premixed flour. One day I'll venture out. Gluten free dough is not kneaded, just mixed. I was not sure what it was to look like but it was a thick batter.  I hope if you try it you will also have success and you will enjoy it too.

Ingredients:
  • 2 tbsp dry active yeast
  • 2 tsp sugar
  • 1 1/2 cup very warm water
  • 3 tsp xanthan gum
  • 2 tbsp olive oil
  • 3 cups gluten free flour blend (I used Kinnikinnick)
  • 1 1/2 tsp salt
  • 2 eggs, slightly beaten
  • 1 tsp apple cider vinegar
  • corn meal
  • 2 tbsp butter, melted
Method:
  1. Stir sugar and yeast into warm water and allow to stand for 6-8 minutes. It will double in volume. 
  2. In a large mixing bowl combine and stir together very well the flour, salt and xanthan gum.
  3. Stir together the eggs, oil and apple cider vinegar, give the yeast a good stir and add all to the dry ingredients.
  4. Beat on low until ingredients are combined and then turn to medium and beat 3-4 minutes. The dough will be like a thick batter. 
  5. If you have french bread pans grease and sprinkle lightly with corn meal. I don't have those pans so I placed parchment on a baking sheet, lightly greased it and sprinkled it with corn meal. Which ever pans you use, now spoon batter into two french bread shaped loafs, smoothing out best you can with the back of a spoon. 
  6. Slash the top of each loaf with a sharp knife. Brush the tops and sides of each loaf with melted butter.
  7. Let rise in a draft free place for 30 minutes. (I let them rise in the oven with the interior light on)
  8. Pre heat oven to 400º.  To give this bread the authentic crusty crust on the outside and soft crumb inside I placed a small pan of water in the oven to add steam. I left it in while the bread baked as well. I don't know if that made a difference but the bread turned out perfect.
  9. Bake for 40 minutes. Remove from baking sheet to a cooling rack immediately.
Slice while still warm or allow to cool and bag for later. The next day this bread was still soft and fresh tasting. I did not freeze it but I'm sure you could. 


Enjoy a slice!

Date Balls


These are a no bake easy treat and if you buy gluten free Rice Krispies cereal they are a gluten free treat!

Date Balls

1 pound dates, chopped
1/2 Cup butter
1 Cup sugar
1 egg, beaten
1 teaspoon vanilla
4 cups Rice Krispies
1 cup walnuts, chopped (you can substitute pecans)
1/4 cup powdered sugar

Combine dates, butter, sugar, and beaten egg in a saucepan. Cook on medium heat for 10 minutes. Turn down heat if necessary after 5 minutes. Stir occasionally to prevent sticking or burning. Remove from heat and add vanilla. In a large bowl, mix the Rice Krispies and chopped nuts. Pour date mixture over cereal mixture. Stir. Let Cool. Roll into balls a little larger than a walnut. Put powdered sugar in a bag and shake a few balls at a time until coated with sugar. Store in covered container. They keep well. Do not freeze. Yields 6 dozen.

Fried Egg Dessert


Here's a dessert if you want to have some fun with a 'menu' ... or if you are cooking for that man who loves 'breakfast all day'.

Before we talk about the recipe .....Let's step back into my mother's Mennonite kitchen.

She often had standing on her cupboard a bowl of rich milk from our own cow. There it would sit until it thickened with a slightly sour taste and velvety texuture. I never ate it but when I started dating my husband-to-be we discovered it was a comfort food to him. After that, if my mom knew he was coming, she made sure she greeted him with a bowl of what was called "Dikja Malch" (Thick Milk) Now, hop-skip-jump over land or ocean to the kitchen of a famous French chef. He is preparing Crème Fraiche (pronouced krem fresh) Thick Milk or Crème Fraiche -- what's in a name ?? the transformation of common to gourmet !

Purchasing Crème Fraiche can be expensive but easy to make yourself.
* 2 cups whipping cream
* 2 tbsp buttermilk

1.Heat slightly the 2 cups whipping cream - not more than to 40 C - this makes the cream barely warm.
2.Stir in the buttermilk.
3.Pour into a jar or bowl and cover lightly with plastic wrap and set in a warm place in your kitchen. Don't touch it for 24 hours. It should be thickened and have a slightly sour/nutty taste. For a stronger flavour and firmer texture leave for several more hours. 4.
When done, refrigerate. It will keep in the fridge up to a week.

TIP - Crème Fraiche can be whipped (after being chilled in fridge) When whipped with a little sugar and vanilla it makes an amazing dessert topping - it permanently holds it's shape without stabilizers and it is delicious ! Crème Fraiche is used in a variety of recipes, only a 'google' away!


For the fun 'Fried Egg Dessert'

1. Drain a tin of canned peach halves - will be about 1/2 cup of liquid.
2. Mix 1 tsp sugar with 1 tsp cornstarch in a small sauce pan and add the peach liquid - stirring well .
3. Cook, stirring constantly, until mixture clears and thickens.
4. Chill
5. Spoon Creme Fraiche onto a dessert plate. (you could, of course, use plain yoghurt)
6. Carefully place a peach half in the middle.
7. Spoon the peach glaze over the top.

(my husband chuckled when I served him this dessert but thought it needed 'pepper' and suggested that finely grated dark chocolate would do it ! )

***

'Don't Tell' Yeast Doughnuts - Gluten Free


For those of you who have been asking for gluten free doughnuts , here they are !!
I am 'famous' (smile) for my regular wheat doughnuts and I was skeptical whether I could come up with a gf doughnut worth making.

I developed a recipe that passed the taste/texture test and is also a dough that handles easily and rises well , holding its shape !
These doughnuts are light, fluffy with much the same crumb and taste as regular yeast doughnuts.
**The recipe makes about 2 dozen... depending on how many 'holes' you make.

Doughnuts
  • 1 cup milk
  • 1 tsp sugar
  • 1 tsp unflavoured gelatin
  • 2 tbsp yeast
  • 1/4 cup almond flour
  • 1/2 cup white corn flour
  • 2/3 cup millet flour
  • 1/2 cup potato starch
  • 1/4 cup tapioca starch
  • 1/4 cup brown rice flour
  • 1/3 cup white sugar
  • 1 tsp xanthan gum
  • 1 tsp baking powder
  • dash of salt
  • 1/4 cup oil (I love Grapeseed oil)
  • 1 lg egg
  • 1 tsp vanilla
  • sweet rice flour - for rolling
  1. Heat milk to lukewarm and add to mixed sugar and gelatin , sprinkle yeast over top and let proof
  2. Beat egg, oil, sugar and vanilla in mixer
  3. Add proofed yeast to liquids and mix
  4. Blend thoroughly all dry ingredients and add them all at once to the liquid , beating on high for about a minute
  5. Turn dough out onto counter dusted with sweet rice flour and work in just enough flour to make dough manageable but keeping it very soft . (you will need very little extra flour)
  6. Pat out the dough, using your hands , to about 3/8 inch thickness ..... turning and redusting to keep it from sticking to counter.
  7. Using doughnut cutter cut out doughnuts , rejoining left over dough pieces, again patting to 3/8 inch thickness - repeat until all the dough is either in doughnut shapes or doughnut holes.
  8. Cover with plastic wrap and let rise for about 45 minutes
  9. Deep fry in oil until golden brown .... adjust heat tempeture so the dough when dropped into oil sizzles but not so high that the doughnuts brown too quickly and stay doughy in the middle.
  10. Remove doughnuts to paper toweling covered pan to cool
  11. When cool dip into doughnut glaze (recipe below) or ice doughnut tops with white icing and dip into crushed nuts or chocolate sprinkles or coloured sprinkles
Doughnut Glaze (this is soo delicious - I got the recipe from the old Mennonite Treasury cookbook and have used it for over 40 years)
If you want to ice some doughnuts and glaze some -cut the following glaze recipe in half.
  • 1/2 cup milk
  • 1/2 cup butter
  • 1 cup sugar
  • 1 cup icing sugar
  • 1 tsp vanilla
  1. Mix milk , butter and sugar in a saucepan and bring to a boil ... let boil for 30 seconds or so and remove from heat
  2. Add icing sugar and vanilla and beat until mixture becomes smooth and thickens
  3. Dip doughnuts into glaze (I put the glazed doughnuts into a platter and let the extra glaze pool on the bottom of the platter.... I always smile when after the doughnuts have disappeared from the serving plate and I see the finger or doughnut trails left from scooping up the extra glaze)
* Enjoy!!! - doughnuts best eaten fresh or same day -- if not serving same day freeze them.
A quick zap in the microwave does revive them nicely!